Step by step guide to a new VAMDC node
Let’s have a look at the structural diagram from the Introduction once more:
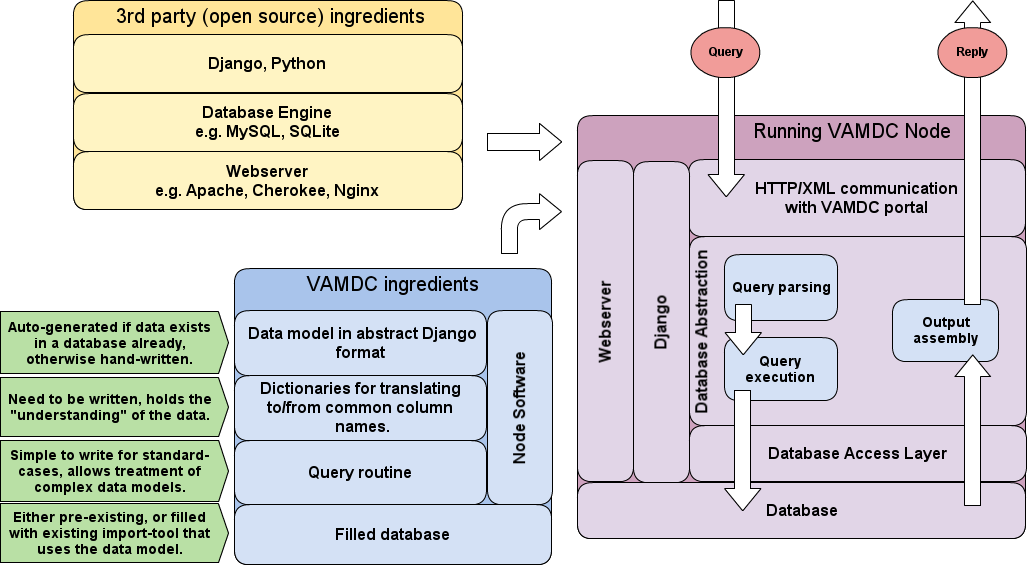
If you have followed the instructions of the page on Software prerequisits and installation, you are done with the yellow box in the figure. This page will tell you first how to configure and write the few code bits that your node needs before running (blue box), and then how to deploy the node and make it run as shown in the violet box.
It goes like this:
- Get the Nodesoftware and make a copy of the example node.
- Auto-create a new settings file and put your database connection there.
- Either
- Write your data model and let Django create the database from it. Then use the import tool to put your data there.
- Let Django write the model from an existing database that you already have.
- Assign names from the VAMDC dictionary to your data to make them globally understandable.
- Start your node and test it.
But let’s take it step by step:
The main directory of your node
Let’s give the directory which holds your copy of the NodeSoftware a name and call it $VAMDCROOT. (It is called NodeSoftware by default and exists whereever you downloaded and extracted it, unless you moved it elsewhere and/or renamed it, which is no problem to do) a name and call it $VAMDCROOT. Let’s also assume the name of the dataset is YourDBname.
Inside $VAMDCROOT you find several subdirectories. For setting up a new node, you only need to care about the one called nodes/ which contains the files for several nodes already, plus the example node. The first thing to do, is to make a copy of the ExampleNode:
$ export VAMDCROOT=/your/path/to/NodeSoftware/
$ # (the last line is for Bash-like shells, for C-Shell use `setenv` instead of `export`
$ cd $VAMDCROOT/nodes/
$ cp -a ExampleNode YourDBname
$ cd YourDBname/
Note
In the following you always work within this newly created directory for your node. You should not need to touch any files or run commands outside it.
Inside your node directory
The first thing to do inside your node directory is to run:
$ ./manage.py
This will generate a new file settings.py for you. This file is where
you override the default settings which reside in settings_default.py (which you should not edit!).
There are only a few configuration items that you need to fill
- The information on how to connect to your database.
- A name and email address for the node administrator(s).
- Example queries that makes sense with your data.
- Optionally you can set the location of the log-file and override other options by copying from
settings_default.py.
The structure for filling in this information is already inside the newly created file. You can leave the default values for now, if you do not yet know what to fill in.
There are only three more files that you will need to care about in the following:
node/models.pyis where you put the data model,node/dictionaries.pyis where you put the dictionaries andnode/queryfunc.pyis where you write the query function,
all of which will be explained in detail in the following.
The data model and the database
By data model we mean the piece of Python code that tells Django the layout of the database, including the relations between the tables. By database we mean the actual relational database that is to hold the data. (See also The main concepts behind the implementation).
There are two basic scenarios to come up with these two ingredients. Either the data are already in a relational database, or you want to create one.
Case 1: Existing database
If you want to deploy the VAMDC node software on top of an existing relational database, the data model for Django can be automatically generated by running:
$ ./manage.py inspectdb > node/models.py
This will look into the database that you told Django about in settings.py
above and create a Python class for each table in the database and attributes
for these that correspond to the table columns. An example may look like this:
from django.db.models import *

class Species(Model):
    id = IntegerField(primary_key=True)
    name = CharField(max_length=30)
    ion = IntegerField()
    mass = DecimalField(max_digits=7, decimal_places=2)
    class Meta:
        db_table = u'species'
There is one important thing to do with these model definitions, apart from checking that the columns were detected correctly: The columns that act as a pointer to another table need to be replaced by ForeignKeys, thereby telling the framework how the tables relate to each other. This is best illustrated in an example. Suppose you have a second model, in addition to the one above, that was auto-detected as follows:
class State(Model):
    id = IntegerField(primary_key=True)
    species = IntegerField()
    energy = DecimalField(max_digits=17, decimal_places=4)
    ...
Now suppose you know that the field called species is acutally a reference to the species-table. You would then change the class State as such:
class State(Model):
    id = IntegerField(primary_key=True)
    species = ForeignKey(Species)
    energy = DecimalField(max_digits=17, decimal_places=4)
    ...
Note
You will probably have to re-order the classes inside the file
models.py. The class that is referred to needs to be defined before
the one that refers to it. In the example, Species must be above State.
Let’s add a third model:
class Transition(Model):
    id = IntegerField(primary_key=True)
    species = ForeignKey(Species)
    upper_state = ForeignKey(State, related_name='transup')
    lower_state = ForeignKey(State, related_name='translo')
    wavelength = FloatField()
The important thing here is the related_name. Whenever you want to define more than one ForeignKey to the same model, you need to set this to an arbitrary name. This is because Django will automatically set up the reverse key for you and needs to give it a unique name. The reverse key in this example could be used to get all the Transitions that have a given State as upper or lower state. More on this at Setting the related name of a field.
Once you have finished your model, you should test it. Continuing the example above you could do something like:
$ ./manage.py shell
>>> from node.models import *
>>> allspecies = Species.objects.all()
>>> allspecies.count() # the number of species is returned
>>> somestates = State.objects.filter(species__name='He')
>>> for state in somestates: print state.energy
>>> sometransitions = Transition.objects.filter(wavelength__lt=500)
>>> atransition = sometransitions[5]
>>> othertransitions = atransition.upper_state.transup.objects.all()
>>> othertransitions.count() # gives the number of transitions with the
                             # same upper state.
Detailed information on how to use your models to run queries can be found in Django’s own excellent documentation: http://docs.djangoproject.com/en/1.3/topics/db/queries/
Case 2: Create a new database
In this case we assume that the data are in ascii tables of arbitrary layout. The steps now are as follows:
- Write the data model in your
node/models.py. - Create an empty database with corresponding user and password
- Tell the node software where to find this database.
- Let the node software create the tables
- Use the import tool to fill the database with the data.
First of all, you need to think about how the data should be structured. Data conversion (units, structure etc) can and should be done while importing the data since this saves work and execution time later. Since the data will need to be represented in the common XSAMS format, it is recommended to adopt a layout with separate tables for species, states, processes (radiative, collisions etc) and references.
Deviating data models are certainly possible, but will involve some more work on the query function (see below). In any case, do not so much think about how your data is structured now, but how you want it to be structured in the database, when writing the models.
Writing your data models is best learned from example. Have a look at the
example from Case 1 above and at file $VAMDCROOT/nodes/vald/node/models.py
inside the NodeSoftware to see how the model for VALD looks like. Keep in mind
the following points:
- As mentioned, a class in the model becomes a table in the database and the fields/members of the class correspond to the table columns.
- Each class should have one member with primary_key=True. If not, one called id will be implicitly created for you.
- How you name your classes and fields is up to you. Sensible names will make it easier to write the dictionaries below.
- Use the appropriate field type for each bit of data, e.g. BooleanField, CharField, PositiveSmallIntegerField, FloatField. There is also a DecimalField that allows you to specify arbitrary precision which will also be used in later ascii-representations of data.
- Use ForeignKey() to another class’s primary key to connect your tables.
- The full list of possible fields can be found at http://docs.djangoproject.com/en/1.3/ref/models/fields/.
- If you know that a field will be empty sometimes, add null=True to the field definition inside the brackets ().
- For fields that are frequent selection criteria (like wavelength for a transition database), you can add db_index=True to the field to speed up searches along this column (at the expense of some disk space and computation time at database creation).
- If you do not define a table name for your model with the Meta class, as in the first example above, the table in the database will be named as the model, but lowercase and with a prefix node_.
Once you have a first draft of your data model, you test it by running (inside your node directory):
$ ./manage.py sqlall node
This will (if you have no error in the models) print the SQL statements that
Django will use to create the database, using the connection information in
settings.py. If you do not know SQL, you can ignore the output and move
straight on to creating the database:
$ ./manage.py syncdb
Now you have a fresh empty database. You can test it with the same commands as mentioned at the end of Case 1 above, replacing “Species” and “State” by your own model names.
Note
There is no harm in deleting the database and re-creating it after
improving your models. After all, the database is still empty at this stage
and syncdb will always create it for you from the models, even if you
change your database engine in settings.py. The command for re-creating
the tables in the database (deleting all data!) is ./manage.py reset
node.
Note
If you use MySQL as your database engine, we recommend its internal storage engine InnoDB over the standard MyISAM. You can set this in your settings.py by adding ‘OPTIONS’: {“init_command”: “SET storage_engine=INNODB”} to your database setup. We also recommend to use UTF8 as default in your MySQL configuration or create your database with CREATE DATABASE <dbname> CHARACTER SET utf8;
How you fill your database with information from ascii-files is explained in the next chapter: How to get your data into the database. You can do this now and return here later, or continue with the steps below first.
Using the XML generator
Before we go on to the remaining two ingredients, the query function and the dictionaries, we need to have an understanding on how they play together in the XML generator. As you remember from The XSAMS schema, the goal is to run queries on your models and pass on the output to the generator so that it can looped over them to fill the hierarchical XSAMS structure.
In order to make this work, we need to name the variables that you pass into the generator (as explained below) and the loop variables that you use in the Returnables. For example, continuing on the model above: Assume you have made a selection of your Transition model; you pass this on under the name RadTrans; the generator loops over it, calling each Transition insite its loop RadTran (note the singular!). RadTran is now a single instance of your Transition model and has the wavelength as RadTran.wavelength since we called the field this way above. The entry in the RETURNABLES would therefore look like ‘RadTranWavelenth’:’RadTran.wavelength’ - where the first part is the keyword from the VAMDC dictionary (which the generator knows where in the schema it should end up) and the second part tells it how to get the value from the query results that it got from your query function.
Do not fret if this sounded complicated, it will become clear in the examples below. Just read the previous paragraph again after that.
Here is a table that lists the variables names that you can pass into the generator and the loop variables that you use in the Returnables. The one is simply the plural of the other.
| Passed into generator | Loop variable | Object looped over | Loop variable |
|---|---|---|---|
| Atoms | Atom | ||
| Atom.States | AtomState | ||
| Atom.Components | Component | ||
| Atom.Component.SuperShells | AtomSuperShell | ||
| Atom.Component.Shells | AtomShell | ||
| Atom.Component.ShellPairs | AtomShellPair | ||
| Molecules | Molecule | ||
| Molecule.States | MoleculeState | ||
| Molecule.State.Parameters | Parameter | ||
| Molecule.State.Parameter.Vector | VectorValueOA | ||
| Molecule.NormalModes | NormalMode | ||
| Molecule.State.Expansions | Expansion | ||
| Molecule.State.Expansion.Coefficients | Coefficient | ||
| Solids | Solid | ||
| Solid.Layers | Layer | ||
| Solid.Layer.Components | Component | ||
| Particles | Particle | ||
| RadTrans | RadTran | ||
| RadTran.Shiftings | Shifting | ||
| RadTran.Shifting.ShiftingParams | ShiftingParam | ||
| RadTran.Shifting.ShiftingParam.Fits | Fit | ||
| RadTran.Shifting.ShiftingParam.Fit.Parameters | Parameter | ||
| RadCross | RadCros | ||
| RadCros.BandModes | BandMode | ||
| CollTrans | CollTran | ||
| CollTran.Reactants | Reactant | ||
| CollTran.IntermediateStates | IntermediateState | ||
| CollTran.Products | Product | ||
| CollTran.DataSets | DataSet | ||
| CollTran.DataSet.FitData | FitData | ||
| CollTran.DataSet.FitData.Arguments | Argument | ||
| CollTran.DataSet.FitData.Parameters | Parameter | ||
| CollTran.DataSet.TabData | TabData | ||
| NonRadTrans | NonRadTran | ||
| Environments | Environment | ||
| Environment.Species | EnvSpecies | ||
| Particles | Particle | ||
| Sources | Source | ||
| Methods | Method | ||
| Functions | Function | ||
| Function.Parameters | Parameter |
The third and fourth columns are for an inner loop. So for example the generator loops over all Atoms, calling each atom insteance Atom. To extract all states being a part of this particualar Atom, the generator will assume that there is an iterable States defined on each Atom over which it will iterate. So it will loop over Atom.States, calling each of state AtomState in the inner loop, like this:
for Atom in Atoms:

    [...]

    for AtomState in Atom.States:

         [...]
It is up to you to make sure the Atom.States is defined if you want to output state information. This is covered in the next section.
The query routine
Now that we have a working database and data model and know in principle how
the generator works, we simply need to tell the framework how to run a query
and pass the output to the generator. This is done in a single function called
setupResults() which must be written in the file node/queryfunc.py in your
node directory. It works like this:
- setupResults() is called from elsewhere and you need not run it yourself.
- setupResults() gets an object as input, called sql. This is a parsed version of the query that comes in. It holds the WHERE-part as sql.where and so on.
- We now need to run this query on the data model in order to get so called QuerySets which are basically unevaluated queries that are then passed on to the XML generator which takes care of the rest.
- If you want to enforce limits on how much data can be returned in one query, this can be done here as well.
- You should also calculate some statistics on how much information a query returns and return it as header information.
In a concrete example of an atomic transition database, it looks like this:
1 2 3 4 5 6 7 8 9 10 11 12 13 14 15 16 17 18 19 20 21 22 23 24 25 26 27 28 29 30 31 32 33 34 35 36 37 38 39 40 41 42 | from django.db.models import Q
from vamdctap.sqlparse import *
from dictionaries import *
from models import *
LIMIT = 10000
def setupResults(sql):
q = sql2Q(sql)
transs = Transition.objects.filter(q).order_by('wavelength')
ntranss = transs.count()
if ntranss > LIMIT:
percentage = '%.1f'%(float(LIMIT)/ntranss *100)
limitwave = transs[LIMIT].wavelength
transs = Transition.objects.filter(q,Q(vacwave__lt=limitwave))
else: percentage=None
spids = set( transs.values_list('species_id',flat=True) )
species = Species.objects.filter(id__in=spids)
nspecies = species.count()
nstates = 0
for specie in species:
subtranss = transs.filter(species=specie)
up=subtranss.values_list('upper_state_id',flat=True)
lo=subtranss.values_list('lower_state_id',flat=True)
sids = set(up+lo)
specie.States = State.objects.filter(id__in = sids)
nstates += len(sids)
headerinfo={'TRUNCATED':percentage,
'COUNT-ATOMS':nspecies,
'COUNT-STATES':nstates,
'COUNT-RADIATIVE':ntranss
'APPROX-SIZE':ntranss*0.001
}
return {'RadTrans':transs,
'Atoms':species,
'HeaderInfo':headerinfo
}
|
Explanations on what happens here:
- Lines 1-4: We import some helper functions from the sqlparser and the
dictionaries and models that reside in the same directory as
queryfunc.py - Line 6: Set the limit of transitions for use below.
- Line 7: Begin the function setupResults. Do not change this line.
- Line 9: This uses the helper function where2q() to convert the information in sql.where to QueryObjects that match your model, using the RESTRICTABLES (see below). The result from where2q() is a string that needs to be executed with eval().
- In line 10 we simply pass these QueryObjects to the Transition model’s filter function. This returns a QuerySet, an unevaluated version of the query, which we assign to the variable transs. We also ordered it by wavelength.
- Line 11: We use the count() method on the QuerySet to get the number of transitions which we later pass into the header.
- Line 13-17: We check if the number is larger than our limit and shorten the QuerySet if necessary. This is done by getting the wavelength at the limit and making a new QuerySet that has as an additional restriction the new upper wavelength limit. We also prepare a string with the percentage for the headers.
- Lines 19-29: Here comes the tricky part. For the selected transitions, we
now need to create the corresponding atoms/species, since they go into
different parts of the generator, see the table above. Not only that, each
atom should have attached its list of states that are upper or lower states
for the selected transitions - there is an inner loop over Atom.States in
the generator, remember? In detail:
- Line 19: We pull a single column out of the Transitions model, the key that links to the Species model. We put that into a set() to throw out duplicates.
- Line 20: We use this set to query for all our Species.
- Line 21: We count them and save the result for later.
- Line 22: We make a new variable for the number of states which we will increase in the coming loop.
- Line 23: Start a loop over our selected species.
- Line 24: Make a sub-selection on our previously selected transitions, now only selecting the ones that belong to the current species.
- Lines 25-26: As for the species IDs before, we now pull the keys to the upper and lower states out of our Transition model.
- Line 27: We concatenate the two lists of IDs and put them in a set() to get rid of duplicates. sids is now a list of IDs of all the states within the current species that are used in the selected transtions.
- Line 28: Use this list to make the query on the State model. And, most importantly, attach it to the current species object. This way we have constructed the nested structure for the generator.
- Line 29: For the statistics, we now increase the state count with the number for the current species.
- Lines 31-36: Put the statistics into a key-value structure where the keys are the header names as definded by the VAMDC-TAP standard and the values are the strings/numbers that we calculated above.
- Lines 39-41: Return the QuerySets and the headers, again as key-value pairs. The keys are the names from the first column of the table above, so that the generator recognizes them and loops over them at the right place.
Note
As you might have noticed, all restrictions are passed to the Transitions model in the above example. This does not mean that we cannot put constraints on e.g. the species here. We simply use the models ForeignKey in that case in the RESTRICTABLES. An entry there could e.g. be ‘AtomIonCharge’:’species__ion’ which will use the ion field of the species model. Depending on your database layout, it might not be possible to pass all restrictions to a single model. Then you need to write a more advanced query than the shortcuts in Lines 7-8.
Note
We are well aware that adapting the above example to your data is a
non-trivial task unless you know Python and Django reasonably well. There
is a more complete example in ExampleNode/node/queryfunc.py and you can
also have a look at the other nodes’ queryfunc.py which are included in
the NodeSoftware. And, of course, we are willing to assist you in this
step, so feel free to contact us about this.
More comprehensive information on how to run queries within Django can be found at http://docs.djangoproject.com/en/1.3/topics/db/queries/.
The dictionaries
As the last important step before the new node works, we need to define how the data relates to the VAMDC dictionary. If you have not done so yet, please read The VAMDC dictionary before continuing.
What needs to be put into the file node/dictionaries.py is the
definition of two variables that map the individual fields of the
data model to the names from the dictionary, like this:
RESTRICTABLES = {\
'AtomSymbol':'species__name',
'AtomIonCharge':'species__ion',
'RadTransWavelength':'wavelength',
}

RETURNABLES={\
'NodeID':'YourNodeName', # constant strings work
'AtomIoncharge':'Atom.ion',
'AtomSymbol':'Atom.name',
'AtomStateEnergy':'AtomState.energy',
'RadTransWavelength':'RadTran.wavelength',
}
Note
Note for example the use of the names Atom and AtomState on the right-hand side of the dictionary definition. These are examples of the “loop variables” mentioned in the table above and act as shortcuts to the nested data you are storing.
About the RESTRICTABLES
As we have learned from writing the query function above, we can use the RESTRICTABLES to match the VAMDC dictionary names to places in our data model. The key in each key-value-pair is a name from the VAMDC dictionary and the values are the field names of the model class that you want to query primarily (Transition, in the example above, line 10).
The RESTRICTABLES example give fits our query function from above, so we know that the “main” model is the Transitions. Now if a query like “AtomIonCharge > 1” comes along, this can be translated into Transition.objects.filter(species__ion__gt=1) without further ado, which is exactly what where2q() does. Note that we here used a ForeignKey to the Species model; the values in the RESTRICTABLES need to be written from the perspective of the queried model.
Note
Even if you chose to not use the RESTRICTABLES in your setupResults() and treat the incoming queries manually, you are still encouraged to fill the keys (with the values being empty), because they are automatically provided to the VAMDC registry so that external services can figure out which names make sense to query at this node.
About the RETURNABLES
Equivalent to how the RESTRICTABLES take care of translating from global names to your custom data model when the query comes in, the RETURNABLES do the opposite on the way back, i.e. when the data reply is sent by the generator, as we have already seen above.
Again the keys of the key-value-pairs are the global names from the VAMDC dictionary. The values now are their corresponding places in the QuerySets that are constructed in setupResults() above. This means that the XML generator will loop over the QuerySet, getting each element, and try to evaluate the expression that you put in the RETURNABLES.
Continuing our example from above, where the State model has a field called energy, so each object in the QuerySet will have that value accessible at AtomState.energy. Note that the first part before the dot is not the name of your model, but the loop variable inside the generator as it is listed in the second (or forth, in the case of an inner loop) column of the table above.
There is only one keyword that you must fill, all the others depend on your data. The obligatory one is NodeID which you should set to a short string that is unique to your node. It will be used in the internal reference keys of an XSAMS document. By including the NodeID, we make these keys globally unique within VAMDC which will facilitate the merging of data that come from different nodes.
http://dictionary.vamdc.org/returnables/ is where you can browse all the available keywords.
Note
Again, at least the keys of the RETURNABLES should be filled (even if you use your own generator for the XML output) because this allows the registry to know what kind of data your node holds before querying it.
Testing the node
Now you should have everything in place to run your node. If you still need to fill your database with the import tool, now is the time to do so according to How to get your data into the database.
Django comes with a built-in server for testing. You can start it with:
$ ./manage.py runserver
This will use port 8000 at your local machine which means that you should be able to browse to http://127.0.0.1:8000/tap/availability and hopefully see a positive status message.
You should also be able to run queries by accessing URLS like:
http://127.0.0.1:8000/tap/sync?LANG=VSS1&FORMAT=XSAMS&QUERY=SELECT ALL WHERE AtomIonCharge > 1
replacing the last part by whatever restriction makes sense for your data set.
Note
The URL has to be URL-encoded when testing from a script or similar. Web browsers usually do that for you. To also see the statistics headers, you can use wget -S -O output.xml “<URL>”.
You should run several different test queries to your node, using all the Restrictables that you defined. Make sure that the output values matches your expectations.
There is a very convenient software called TAPvalidator (see http://www.vamdc.org/software) which can be used to query a node, browse the output and check that it is valid with respect to the xsams standard.
Once your node does what it should do with the test server, you can start thinking about deploying it.